

From Art to Stitch: How to Digitize Artwork for Embroidery Like a Pro
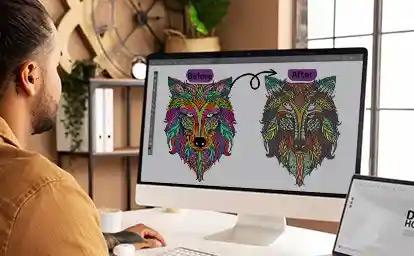
You have a sketchbook full of doodles or a digital file with a beautiful illustration. You look at your embroidery machine and think, "I want to stitch that." You load the image onto a USB stick, plug it in, and wait for the magic. Instead, you get silence. Or worse, you get a garbled mess of thread that looks like a spider had a seizure on your fabric. That is because embroidery machines do not read art. They read coordinates. They read stitch types. They read commands like "needle up" and "thread trim." To bridge that massive gap between your creative vision and the mechanical reality of the needle, you must Digitize Artwork for Embroidery. This is not just pressing a button and hoping for the best. It is a skill that blends artistic judgment with technical precision. And the good news is that you do not need a fine arts degree to get good at it. You just need to understand the rules of the road. Let me walk you through how the pros take a flat piece of art and transform it into a textured, dimensional, stitch-perfect design.
What Digitizing Actually Means
Let us kill the confusion right at the start. Digitizing does not mean scanning a drawing into your computer. That is just creating a digital image file. In the embroidery world, digitizing means building a map. Think of yourself as an architect, not a painter. The painter cares about the colors and the composition. The architect cares about the structural integrity. Where does the foundation go? What supports the roof? Where do the electrical wires run?
When you digitize artwork for embroidery, you are the architect. You decide what sews first, what sews last, and how the thread lays down to prevent the whole thing from collapsing into a puckered mess. You look at a beautiful watercolor painting of a flower and you think, "Okay, I cannot stitch fifty shades of pink. I have to reduce this to four solid thread colors. And the petals need to overlap in a specific order so the needle does not stitch over open air and sink into the fabric." That mental translation is digitizing. It is the most important step in the entire embroidery process, and it is the one that beginners most often overlook. They assume the machine is smart. The machine is not smart. The machine is just obedient. It will do exactly what you tell it to do, even if you tell it to do something stupid like put ten thousand stitches in a one-inch square. The digitizer is the brains of the operation.
The Artwork Cleanup Phase
Before you even open your digitizing software, you need to look at your artwork with a brutally honest eye. Most art is not ready for embroidery. It is too complex, too shaded, or too fuzzy. You need to strip it down to its skeleton.
Take a look at the image you want to stitch. Does it have a drop shadow? Get rid of it. Embroidery thread does not cast a soft, translucent shadow. A drop shadow in digitizing just turns into a weird gray blob that bleeds into the background color. Does it have a gradient that fades from dark blue to light blue? You need to pick one or two solid blues instead. The machine cannot airbrush. It can only lay down distinct, separate blocks of color. Does it have tiny, intricate lines that look amazing on paper? Those lines will close up and become illegible when stitched at anything under four inches wide. You need to thicken them or remove them.
The pros use vector software like Inkscape or Adobe Illustrator to "trace" the artwork and create clean, hard-edged shapes. If you are not a vector artist, you can use the free online tool Photopea or even the built-in editor on your phone. Increase the contrast until the image looks almost like a cartoon. Blast out the background so it is pure white. Make the foreground shapes solid black. This high-contrast version is your blueprint. It gives the digitizing software a clear, unambiguous line to follow. If you try to digitize a fuzzy, low-resolution JPG that you saved from a text message, you will spend hours cleaning up jagged edges and stray pixels. Do the cleanup first. It saves you a mountain of frustration later.
Choosing the Right Stitch Types for the Job
Here is where you start thinking like a pro. When you open your digitizing software and see the tools for "Satin," "Fill," and "Run," you need to know exactly when to use each one. Using the wrong stitch type is the number one cause of amateur-looking embroidery.
Satin stitch is your glossy, beautiful, premium finish. It is the shiny, dense stitch you see on letterman jackets and corporate logos. You use it for borders, for lettering, and for any shape that is narrower than about eight millimeters. If you make a satin stitch too wide, the long threads catch on things, snag, and look sloppy. Keep satin stitches narrow and tight.
Fill stitch, also called Tatami stitch, is your workhorse. It covers large areas with a textured pattern. It is great for the background of a shield logo or the body of a large animal design. You can control the angle and the density of the fill. A pro tip here is to avoid using a standard 45-degree angle for everything. Change the angle for different elements. Stitch the background at 45 degrees and the foreground object at 135 degrees. This subtle shift in light reflection makes the layers visually pop and gives the design depth without using extra colors.
Run stitch is your detail tool and your connector. You use it for tiny details like whiskers on a cat or veins on a leaf. You also use it for underlay. Underlay stitches are the hidden foundation stitches that sew first and get covered up by the satin or fill. You never see them on the finished piece, but they are what separate a pro design from a puckered disaster. Always, always add edge-run underlay to satin borders. It locks the fabric down and gives the top stitches a solid base to grip.
The Secret Weapon: Sequencing Your Design
You can have perfect artwork and perfect stitch types, but if you sequence your design wrong, the whole thing falls apart. Sequencing is the order of operations. It is the answer to the question, "What sews first, and what sews next?"
Imagine you are digitizing a simple logo that is a blue circle with white text across the middle. A beginner might digitize the white text first and then fill in the blue circle behind it. That is a disaster. When the machine goes to fill the blue circle, the needle will come crashing down right on top of the delicate white text, shredding it and ruining the clean edge. The pro sequences it the other way. The pro stitches the entire blue circle background first. Then, the pro places the white text on top. The text sits cleanly on the surface of the blue fill. It looks crisp and professional.
But wait, there is more. The pro also thinks about "push and pull." As the blue circle fills, the fabric stretches slightly. It pulls inward. If you place the white text exactly where the math says it should go, the text might end up slightly off-center because the fabric shifted during the blue fill. To fix this, pros use "pull compensation." They tell the software to push the text outline outward by a tiny fraction of a millimeter before stitching. When the fabric pulls in, the text pulls right into the perfect spot. This is the kind of nuanced thinking that makes digitized artwork look like it was printed, not stitched.
The Fabric Reality Check
You cannot digitize in a vacuum. The file you create for a stiff denim jacket will look like a hot mess on a thin, stretchy t-shirt. You must digitize for the specific fabric.
Stretchy fabrics like jersey knit or performance wear are the enemy of flat embroidery. The needle pushes the fabric down into the throat plate instead of penetrating it cleanly. This causes "flagging." The fabric bounces up and down with the needle, and the stitches end up loose and loopy. To digitize artwork for embroidery on stretchy material like a pro, you must increase the density of the underlay. You need a heavy, zig-zag underlay that essentially glues the fabric to the stabilizer before the top stitching begins. You also need to increase the pull compensation slightly.
For thick, fluffy fabrics like fleece or a puffy vest, the problem is the opposite. The thick pile of the fabric swallows the stitches. A standard satin border will sink into the fluff and disappear. The pro solution is to increase the stitch width and add a wider edge-run underlay. You want the stitches to sit up high and proud on top of the nap. You are basically building a little platform of thread for the design to rest on. If you ignore the fabric type, you can create the most beautiful digital file in the world, and it will still stitch out like garbage.
Testing and Tweaking: The Pro Mindset
Here is the final, non-negotiable step that separates the pros from the hobbyists. Pros sew out a test sample. Every single time. They do not trust the software preview. The software preview lies. It shows perfect, glowing thread under ideal lighting conditions. It does not show thread breaks, tension issues, or registration gaps.
You take that file, load it onto a USB stick, and hoop up a piece of scrap fabric that is similar to your final garment. You watch it sew. You look for gaps between the satin outline and the fill interior. You look for areas where the bobbin thread is pulling through to the top. You look for dense spots where the needle sounds like it is struggling.
Then you go back to the software and tweak. You adjust the pull compensation by two percent. You change the angle of the fill to reduce the pushing effect. You add a trim command where the machine left a long jump stitch. You save a new version and test again. This iterative process is what makes the final result look effortless. It is not effortless. It is the result of careful observation and small, incremental improvements. This is the part that takes time, but it is also the part that builds your confidence. Every tweak you make teaches you something about how thread behaves under tension.
Conclusion
Learning to digitize artwork for embroidery is like learning to play an instrument. At first, you fumble with the keys and the sounds are harsh and awkward. You make mistakes. You digitize a file that is too dense and break a needle. You sequence something wrong and watch colors overlap in ugly ways. That is okay. That is how you learn.
But with each project, you get better. You start to see the art not just as a picture, but as a series of steps and layers. You develop an instinct for when to use satin and when to switch to fill. You learn to feel the fabric and anticipate how it will move under the needle. You stop being a person who just owns an embroidery machine, and you become a true digitizer. You become the bridge between the art in your head and the thread on the fabric. And when you pull that hoop off the machine and see your artwork rendered in perfect, glossy, tactile thread, you realize that all the technical headache was worth it. That is the moment you know you are doing it like a pro.
Bub
Do?

Категории
Больше
Global Impact of Australian Social Media Restrictions As Australia's groundbreaking social media restrictions are set to take effect in just a couple of days, international policymakers are paying close attention. Beginning December 10, major platforms like Instagram, Facebook, Snapchat, TikTok, and YouTube will be mandated to implement measures ensuring that users under 16 are prevented from...
Pawtechpet presents the Intelligent Pet Water Dispenser , a cutting-edge appliance designed to keep pets hydrated effortlessly. Combining technology, hygiene, and durability, this device transforms everyday pet care into a convenient and reliable routine. Proper hydration is essential for pets'health and vitality. This water dispenser ensures a constant supply of fresh water while...
Streaming Platform Updates The streaming platform unveils a fresh roster of entertainment this month. Amidst the array of original films and series debuts, the true highlights are the beloved titles making their comebacks. A quartet of captivating series are set to resume, promising ample material for extended viewing sessions. One of these highly anticipated new seasons is already accessible...
Эппл Айфон Эйр в web-магазине Vipmobile - это соединение стиля, воздушности и сражающей мощности. Безупречное решение для обыденных задач и деятельности - iphone air 256gb купить. Предоставленная модель пользуется большим спросом в Москве среди тех, кто ценит хорошее качество Эппл в малогабаритном исполнении, обеспечивающем совершенный баланс комфорта и эффективности.Техно начинка iPhone...
Understanding the True Meaning of Essentials In today’s fast-paced world, Essentials define the very core of a balanced and efficient lifestyle. They are the critical elements that simplify our daily routines, improve productivity, and create the foundation for success. Whether we are discussing daily life essentials, fashion essentials, home essentials, or personal development...